Smart Contract: Build a Fullstack DAPP on NEAR using Rust, Near-API-Js, React & Chakra-UI


Introduction
As we may already know, the web is evolving, with the existence of blockchain, decentralized applications (dApp), decentralized autonomous organization (DAO), and web3. The NEAR blockchain is one of several blockchain networks available.
The NEAR blockchain is a layer one, sharded, proof-of-stake blockchain that prioritizes usability and performance for both developers and users. Smart contracts written in AssemblyScript, JavaScript, or Rust can interact with the NEAR blockchain. More information is available in the official documentation.
Building a NEAR Quote dApp
In this article, we will create a Quote dApp by writing the NEAR smart contract in Rust with the goal of interacting with and changing the state of a smart contract on the NEAR blockchain.
This project will be divided into two parts:
A smart contract - is a contract that stores and retrieves data on the blockchain.
The frontend - The interface through which you interact with the smart contract.
You will have a basic understanding of how to build a decentralized Quote application on the NEAR Blockchain by the end of this article.
Prerequisites
Node.js ≥ 12 installed on your machine.
Basic understanding of Rust
Basic knowledge of React
A NEAR testnet account
Comfortable using terminal
Smart Contract Tech Stack
The following will be used as a tech stack to build out a functional smart contract:
rustup toolchain
near-cli
Setting up the project
For Windows, add the Windows Subsystem for Linux by following the instructions here (WSL 2).
Use the following command to install Rust on Linux or MacOS.
curl --proto '=https' --tlsv1.2 https://sh.rustup.rs -sSf | sh
Run the following command after successfully installing rustup to configure your current shell:
source $HOME/.cargo/env
Following that, we must add the wasm target to the toolchain, which Rust uses to produce WebAssembly as an output. In your terminal, enter the following command:
rustup target add wasm32-unknown-unknown
Getting started with NEAR
The smart contract lives on the NEAR network and can be accessed via exposed methods.
To build on NEAR with Rust, you must understand the following programming concepts:
Modules
Collections
Data Types
Structures
Create the Project Structure
Use the code block below in the terminal to generate the project structure:
npx create-near-app near-dapp --contract rust --frontend react
To get you started, the above command will create the entire folder structure, which will include both the frontend and the contract.
Launch your preferred IDE and navigate to the project folder. Go to the /contract/src/lib.rs directory. That is the smart contract entry file. There is an example smart contract there. We'll clean that up and create the Quote dApp's entire smart contract structure.
Before we get into the nitty-gritty of creating the smart contract's state and functions, we should review some programming concepts mentioned earlier to better understand the flow. The following are examples:
Modules
Modules are used in NEAR to reuse third-party libraries and to help organize your code. The NEAR SDK, which offers a lot for your contract, is the main module used in NEAR.
use near_sdk::borsh::{self, BorshDeserialize, BorshSerialize};
use near_sdk::{env, near_bindgen, AccountId};
use near_sdk::collections::{UnorderedMap};
The code block above demonstrates how to use the NEAR SDK. It contains everything required to create a working smart contract. For example, BorshDeserialize, BorshSerialize, near_bindgen, env, and so on.
Collections
Depending on the use case, collections are used to manage large data structures. The NEAR SDK collections store data in persistent storage. To gain access to an element, simply deserialize it. It also has pagination. More on Collections can be found here.
use near_sdk::collections::UnorderedMap;

#[near_bindgen]
#[derive(BorshDeserialize, BorshSerialize, PanicOnDefault)]
pub struct Contract {
  pub history: UnorderedMap<AccountId, String>,
}
Data Types
NEAR smart contracts can also use primitive data types. Several examples can be found in the code block below:
u8, u16, u32, u64, u128, i8, i16, i32, i64, i128, String, &str, Vec<T>, ...
Structures
The Struct in a NEAR smart contract represents the state of the contract, upon which the structure is implemented and functions are created to either mutate or read data from the contract. The keyword pub signifies the named struct is public.
#[near_bindgen]
#[derive(BorshDeserialize, BorshSerialize)]
pub struct Contract {
  pub account_id: String,
  pub total_amount: U128,
}

#[near_bindgen]
impl Contract {
// functions here
}
near bindgen is an important macro in the preceding code block that is used on a struct and the implementation of functions to generate the necessary code to be a valid NEAR contract and expose the intended functions to be able to be called externally.
Create a NEAR Account
Moving forward, we must create two accounts for our project. The first is a top-level account, and the second is a sub-account. Here's an example of what we're talking about:
ogenienis.testnet - A top level account
quote.ogenienis.testnet - A sub-account
The first account will be used to create the second.
Create an account at NEAR Testnet Wallet. If you already have one, you can skip this step.
To access your NEAR account, copy and paste the snippet below into your terminal. Make sure you have the near-cli installed:
yarn install --global near-cli
near login
You should be redirected to your browser to authenticate your terminal access.
Create a sub-account
Create a sub-account using the command below; this account will be used to tip an author.
near create-account quote.ogenienis.testnet --masterAccount ogenienis.testnet --initialBalance 10

Creating the Contract's State
In this section, we will create the contract's state.
The first approach is to use the NEAR SDK to create named structs.
use near_sdk::collections::UnorderedMap;
use near_sdk::json_types::U128;
use near_sdk::Promise;
use near_sdk::{
    borsh::{self, BorshDeserialize, BorshSerialize},
    env, near_bindgen,
    serde::{Deserialize, Serialize},
    AccountId, PanicOnDefault,
};

pub type QuoteId = String; // custom type

#[derive(BorshSerialize)]
pub enum StorageKey {
    QuoteId,
}

#[derive(Serialize, Deserialize)]
#[serde(crate = "near_sdk::serde")]
pub struct JsonQuoteData {
    pub id: QuoteId,
    pub text: String,
    pub author: AccountId,
    pub tip: String,
    pub tip_count: u64,
    pub created_at: u64,
}

#[derive(BorshDeserialize, BorshSerialize)]
pub struct QuoteData {
    pub id: QuoteId,
    pub text: String,
    pub author: AccountId,
    pub tip: String,
    pub tip_count: u64,
    pub created_at: u64,
}

#[near_bindgen]
#[derive(BorshDeserialize, BorshSerialize, PanicOnDefault)]
pub struct Quote {
    owner_id: AccountId,
    quotes: UnorderedMap<QuoteId, QuoteData>,
}
The code block above illustrates the structure of the contract as well as the modules required for the contract to function properly.
The following modules were imported from the NEAR SDK:
#[derive(BorshSerialize, BorshDeserialize)]- Used to Serialize and Deserialize a data structure#[derive(Serialize, Deserialize)]- A data structure can be deserialized and serialized from any data format supported by Serde.#[serde(crate = "near_sdk::serde")]- Serde is a framework for serializing and deserializing data structures in Rust efficiently and also supports JSON.#[derive(PanicOnDefault)]-PanicOnDefaultis used to make the contract panic when the contract is not initialized.
The Structure used in the contract :
QuoteId- This is a named custom type that is set toString.StorageKey- This anenumused to holdQuoteId.JsonQuoteData- This is a namestructused to return data as JSON from certain function calls.QuoteData- This is a namestructthat holds the data for each quote created in the contract.Quote- This is a namestructthat holds the state of the contract. Theowner_idholds who deployed the contractquotesholds all the quotes entered into the contract.
Read and Mutate State Functions
In this section, we will write functions that will interact with our contract's state. We need to create two types of functions:
callfunction - These are functions that can mutate/change the state of our contractviewfunction - These are functions that can read the state of our contract
All functions are to be placed within the implementation block:
impl Quote {
...
}
Initialize Contract State
The function new is used to initialize the contract's state.
#[near_bindgen]
impl Quote {
    #[init]
    pub fn new(owner_id: AccountId) -> Self {
        Self {
            owner_id,
            quotes: UnorderedMap::new(StorageKey::QuoteId.try_to_vec().unwrap()),
        }
    }
}
The #[init] initialization function can only be called once. The smart contract's owner will initialize the smart contract's state on the NEAR blockchain for the first time.
Create Quote Function
create quote will be the next function added. This function is in charge of adding new quotes to the smart contract. Using the following code:
pub fn create_quote(&mut self, author: AccountId, text: String) -> JsonQuoteData {
let quote_id = format!("QUO-{}", (&env::block_timestamp()));
self.quotes.insert(
"e_id,
&QuoteData {
id: quote_id.clone(),
text: text.clone(),
author: author.clone(),
tip: "1000000000000000000000000".to_string(),
tip_count: 0,
created_at: env::block_timestamp(),
},
);
JsonQuoteData {
id: quote_id,
text,
author,
tip: "1000000000000000000000000".to_string(),
tip_count: 0,
created_at: env::block_timestamp(),
}
}
The code block above shows how to create a new quote. After a new quote is created, the data is returned in JSON format.
Fetch Quotes
The function fetch_quotes is used to retrieve all quotes from the smart contract. The function accepts two arguments, from_index takes in a String of "1" and limit takes in a type of u64. This is mainly for pagination if the data present isn't fixed.
  pub fn fetch_quotes(
        &self,
        from_index: Option<U128>,
        limit: Option<u64>,
    ) -> Vec<JsonQuoteData> {
        let start_index: u128 = from_index.map(From::from).unwrap_or_default();
        assert!(
            (self.quotes.len() as u128) > start_index,
            "Error: Out of bounds, start your search with a smaller from_index."
        );

        let limit = limit.map(|v| v as usize).unwrap_or(usize::MAX);
        assert_ne!(limit, 0, "Provide limit higher than 0.");

        self.quotes
            .iter()
            .skip(start_index as usize)
            .take(limit)
            .map(|(id, quote)| JsonQuoteData {
                id: id.to_string(),
                text: quote.text,
                author: quote.author,
                tip: quote.tip,
                tip_count: quote.tip_count,
                created_at: quote.created_at,
            })
            .collect()
    }
Total Quote
The function total_quotes returns the total number of quotes available in the contract.
  pub fn total_quotes(&self) -> U128 {
        U128(self.quotes.len() as u128)
    }
Tip Author
When the Tip function is called, the value 1NEAR is transferred to the author of the quote. We pass the quote id as an argument, and it retrieves the quote. The function also calls the tip_count function, which increases the tip_count value by one each time the tip_author function is called by people who tipped the author. Because tokens are transferred, this is also a #[payable] function.
#[payable]
pub fn tip_author(&mut self, id: QuoteId) -> String {
match self.quotes.get(&id) {
Some(ref mut quote) => {
let tip = quote.tip.parse().unwrap();
assert_eq!(
env::attached_deposit(),
tip,
"attached deposit should be equal to the price of the product"
);
let owner = "e.author.as_str();
Promise::new(owner.parse().unwrap()).transfer(tip);
self.quotes.insert(
"e.id,
&QuoteData {
id: quote.id.clone(),
text: quote.text.clone(),
author: quote.author.clone(),
tip: quote.tip.clone(),
tip_count: quote.tip_count,
created_at: quote.created_at,
},
);
self.tip_count(id.clone());
format!("Tip sent")
}
_ => {
env::panic_str("product not found");
}
}
}
pub fn tip_count(&mut self, id: QuoteId) {
let mut get_quote = self.quotes.get(&id).expect("Not Found");
get_quote.tip_count += 1;
self.quotes.insert(
&get_quote.id,
&QuoteData {
id: get_quote.id.clone(),
text: get_quote.text.clone(),
author: get_quote.author.clone(),
tip: get_quote.tip.clone(),
tip_count: get_quote.tip_count,
created_at: get_quote.created_at,
},
);
}
Delete Quote
To delete a quote, the function delete quote accepts an argument id and uses the assert eq! method to determine whether the user calling the function is the author of the quote. This function can only be called by the author of the quote.
  pub fn delete_quote(&mut self, id: QuoteId) -> String {
        assert_eq!(
            env::predecessor_account_id(),
            self.owner_id,
            "Only owner can delete this quote",
        );

        let quote = format!("{} was deleted successfully", id.clone());
        self.quotes.remove(&id);
        quote
    }
Build, Compile and Deploy Smart Contract
Now that we've implemented the contract functions, run the following command in your terminal to build and compile the smart contract:
yarn deploy
After running the command, you should see the following output in the terminal:
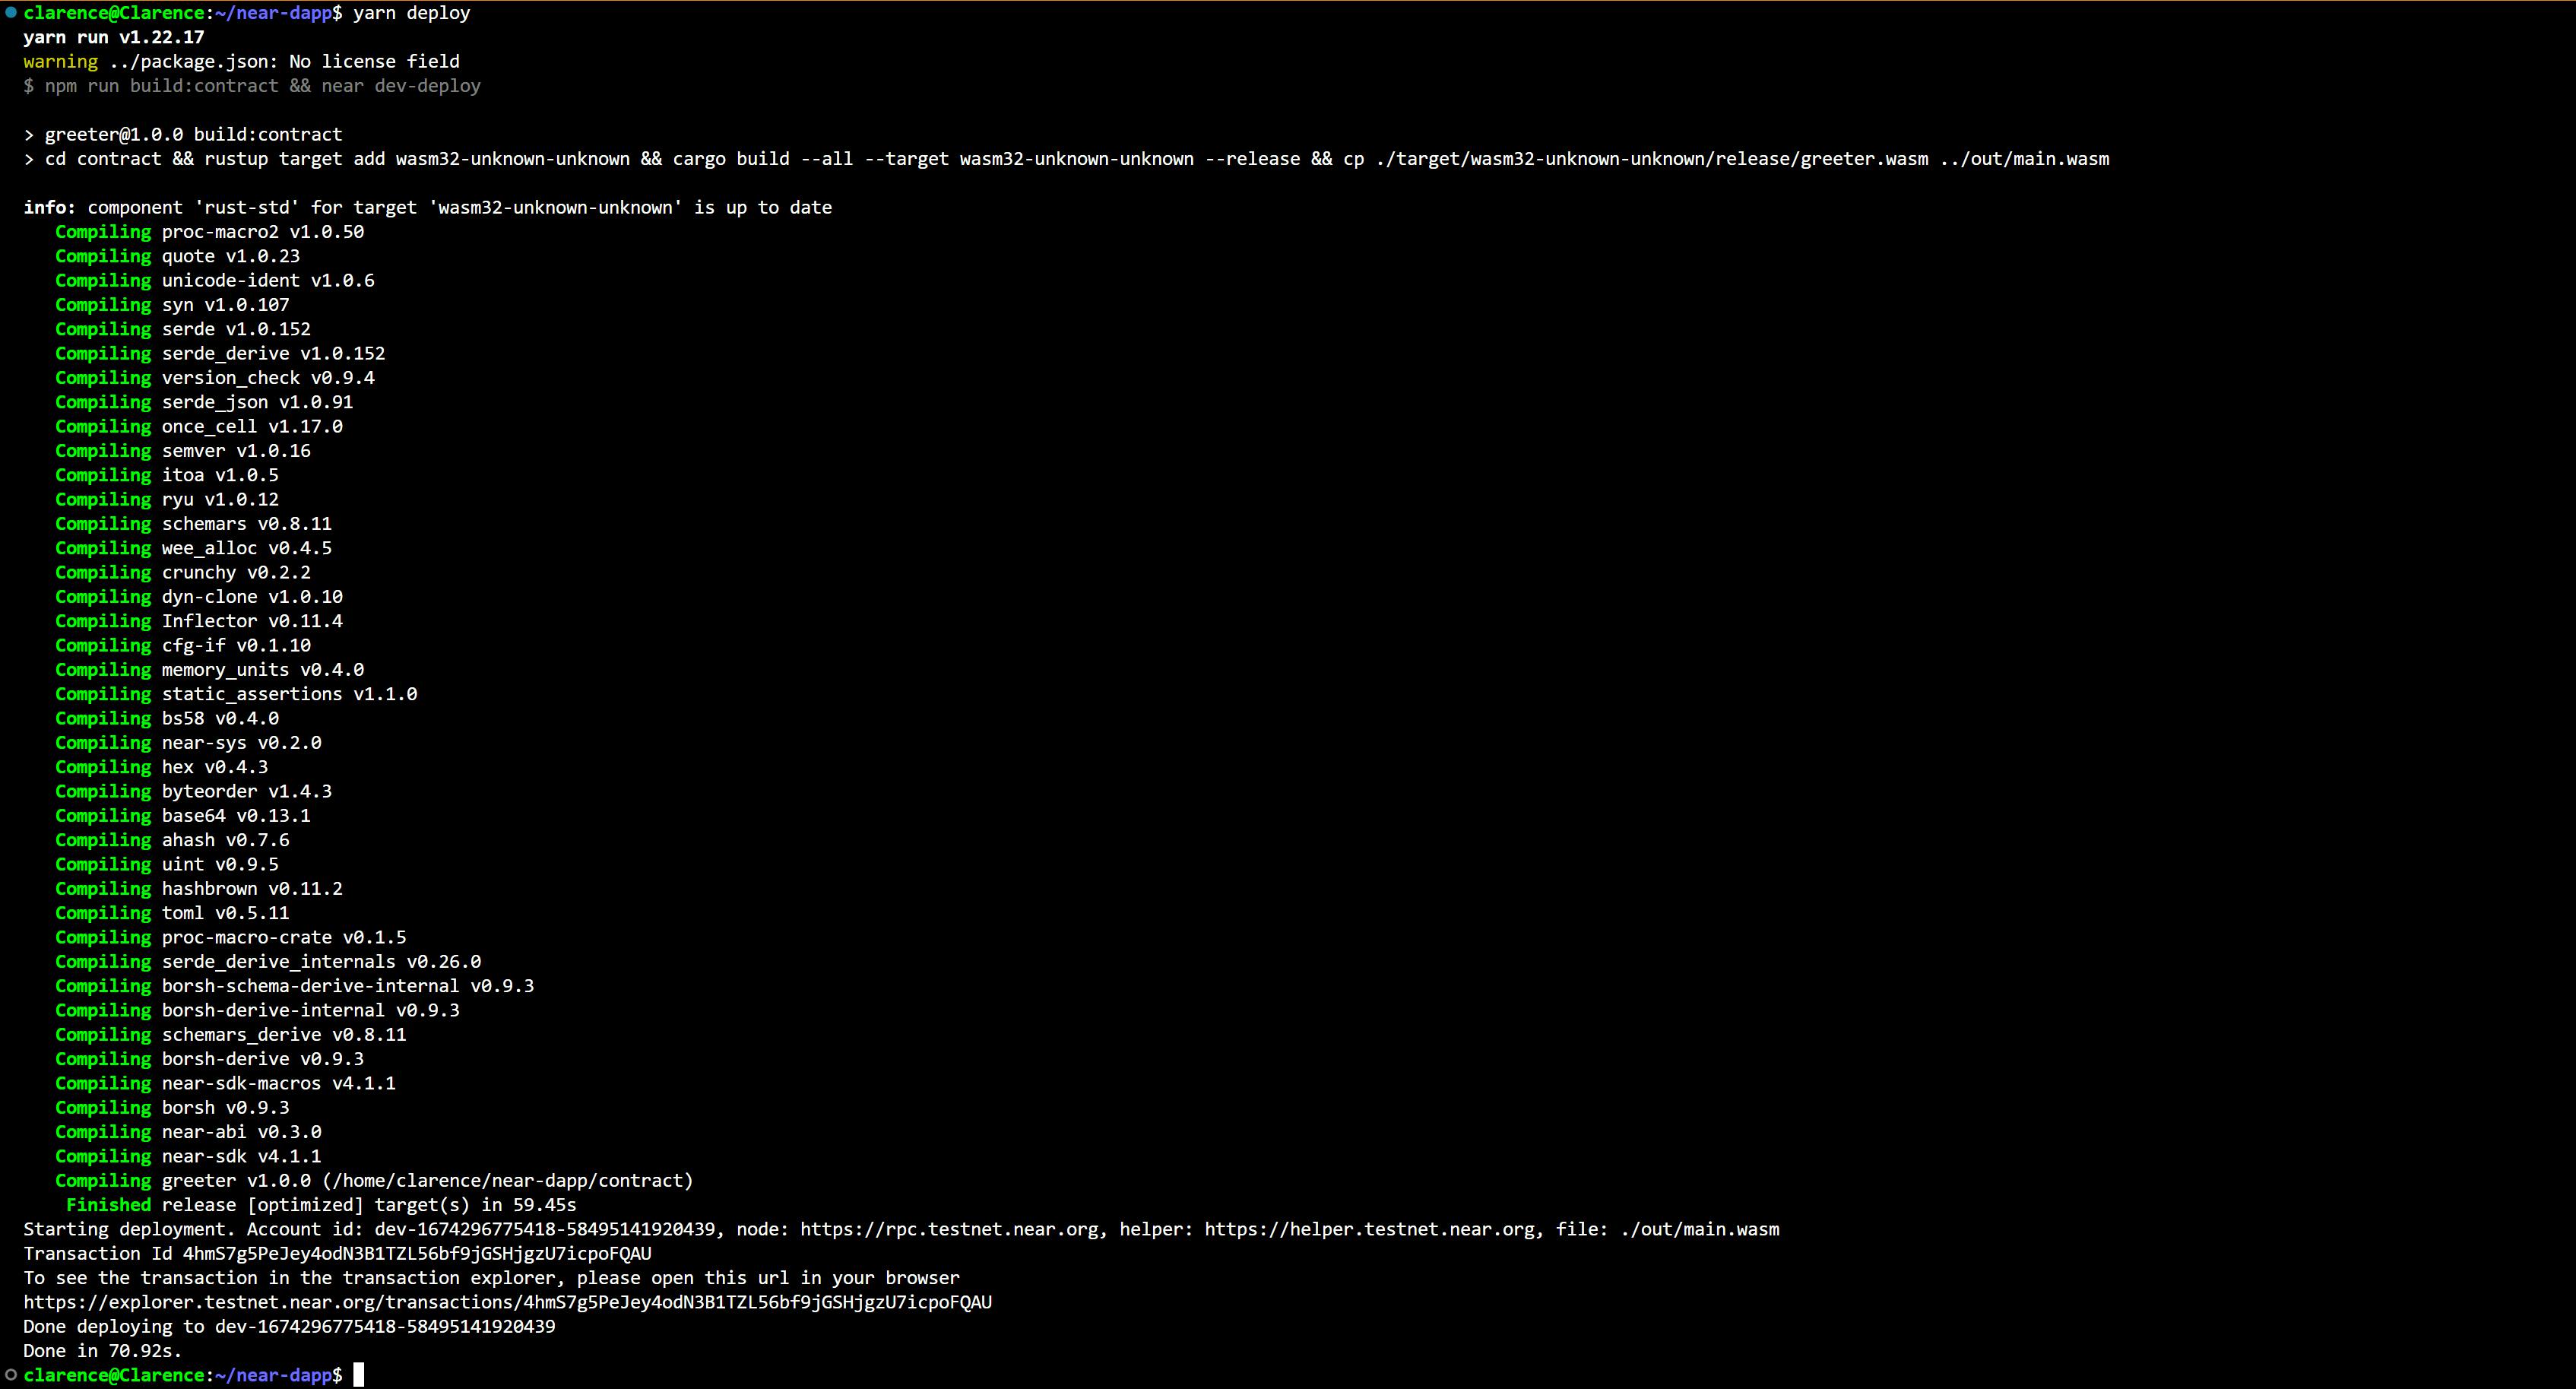
If you see the above output in your terminal, it means that the deployment was successful and the contract was deployed to dev-1674296775418-58495141920439. This applies only to this contract; yours will be different. Inspect your project folders neardev/dev-account to ensure you have the correct contract name. It should be there. The compiled contract can be found in out/main.wasm.
You can view the deployed contract's transaction here.
Making Contract Calls
As previously stated, there are two ways to interact with a smart contract in NEAR:
callfunctionviewfunction
Syntax
near <CONTRACT-CALL-TYPE> <CONTRACT-NAME> <FUNCTION-NAME> <PAYLOAD> --accountId=<ACCOUNT-ID>
<CONTRACT-CALL-TYPE>: This will be either acallorviewtype.<CONTRACT-NAME>: The name of your deployed contract.<FUNCTION-NAME>: The name in the smart contract.<PAYLOAD>: The data you pass in as an argument to the function you are calling. This is optional when<CONTRACT-CALL-TYPE>isview.<ACCOUNT-ID>: The name of your NEAR Account.
Usage
In this section, we will interact with the smart contract that we successfully deployed to the NEAR Blockchain.
To initialize the state of our smart contract, we will call the new function.
Replace
dev-1674296775418-58495141920439with yours inneardev/dev-accountandogenienis.testnetwith your account Id.
New
The function new is used to initialize the smart contract's state. This function accepts an argument owner id, which is the smart contract's owner.
near call dev-1674296775418-58495141920439 new '{"owner_id": "ogenienis.testnet"}' --accountId=ogenienis.testnet
The transaction can be found on the blockchain explorer.

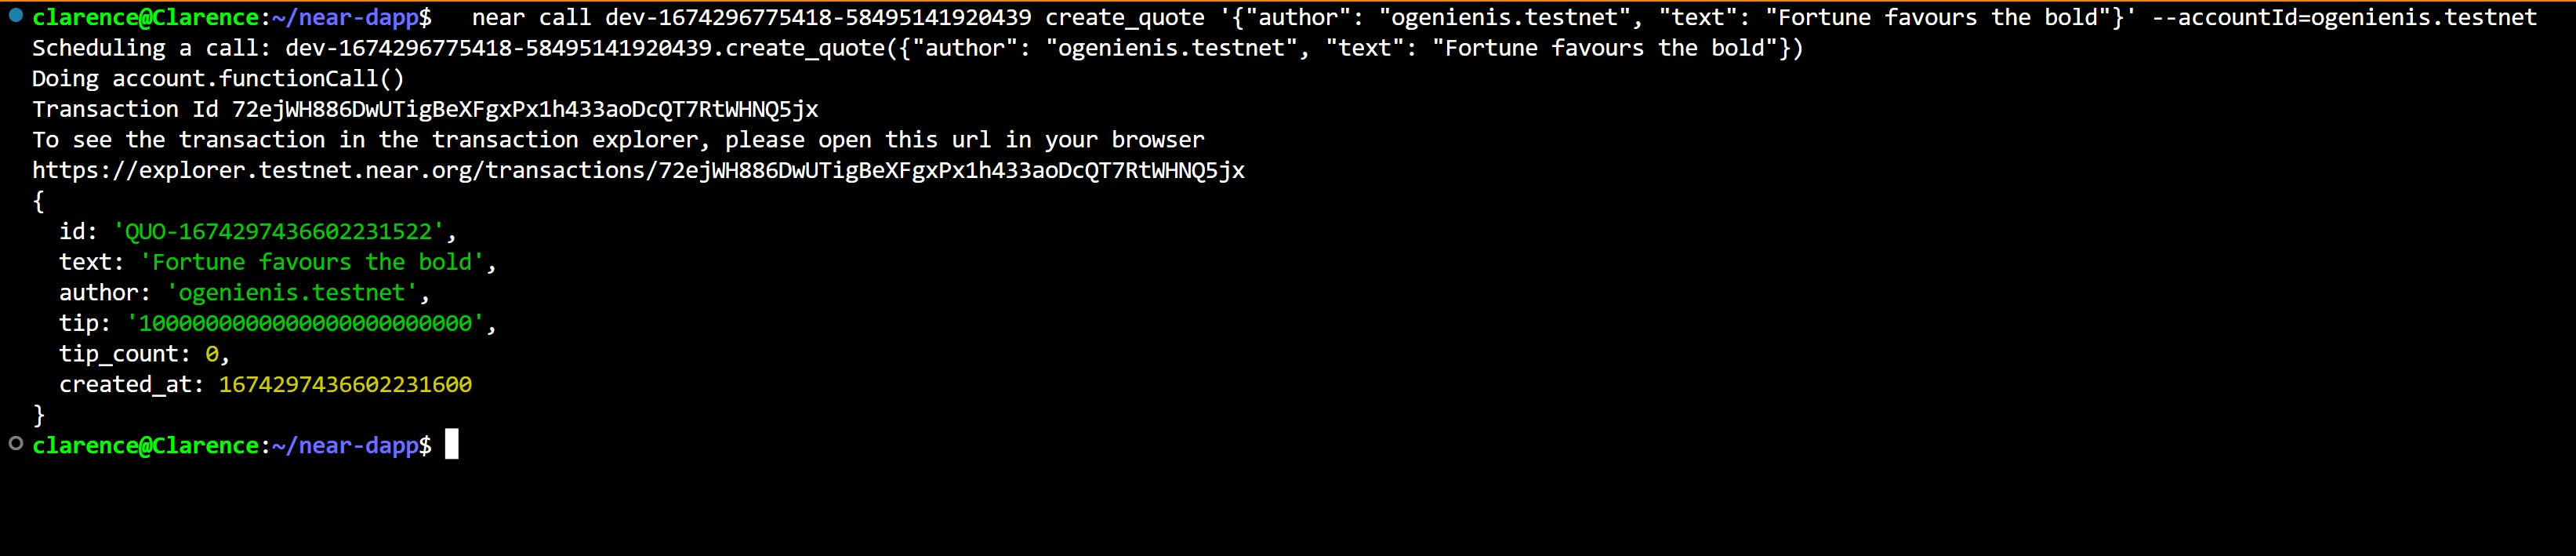
Create Quote
Use the following code to create a quote:
near call dev-1674296775418-58495141920439 create_quote '{"author": "ogenienis.testnet", "text": "Fortune favours the bold"}' --accountId=ogenienis.testnet
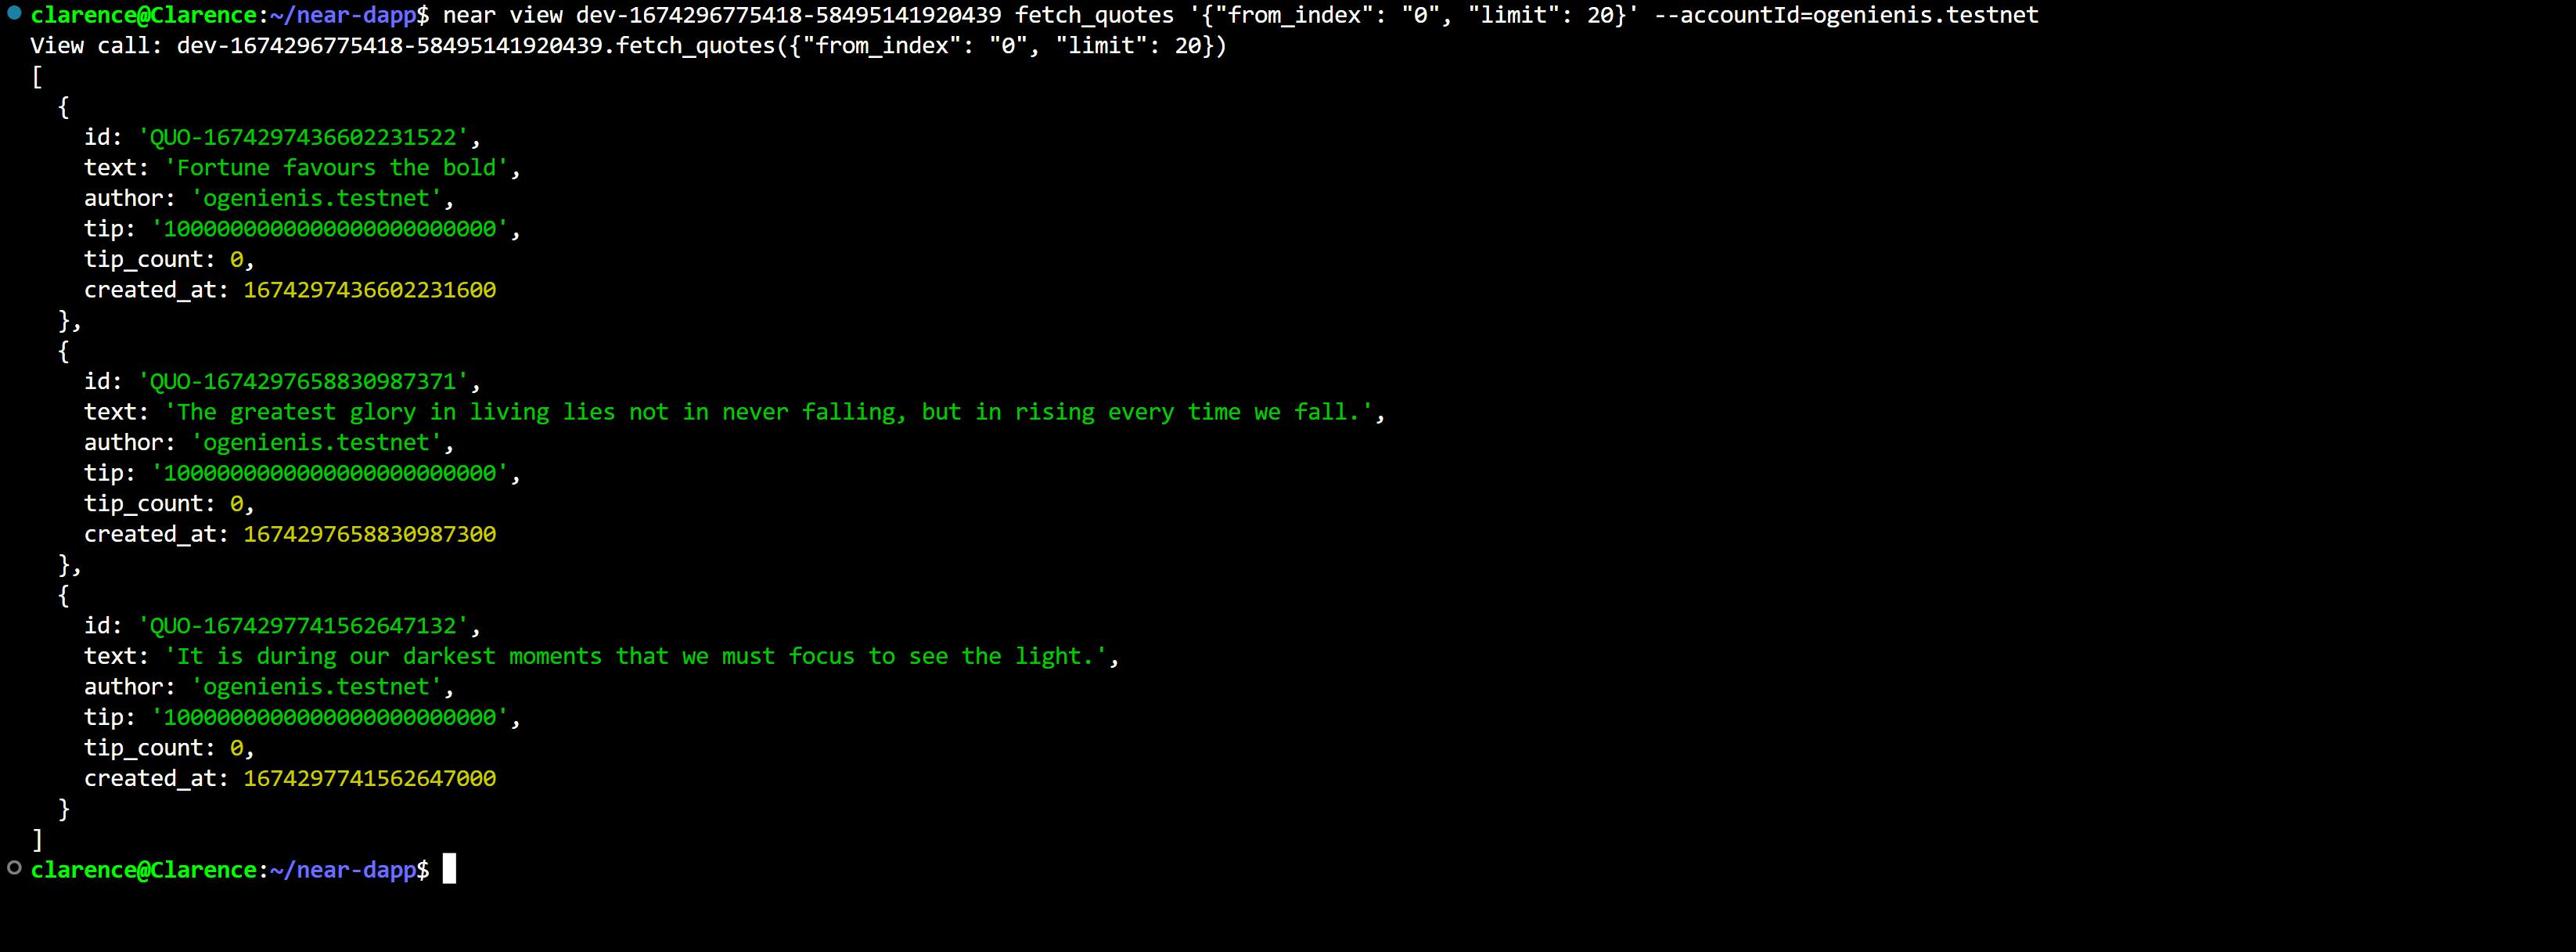
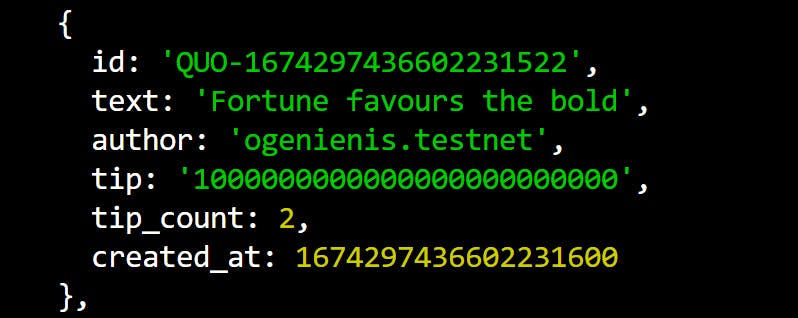
Fetch Quotes
Use the code block below to view the quotes we've stored in the contract's state:
near view dev-1674296775418-58495141920439 fetch_quotes '{"from_index": "0", "limit": 20}' --accountId=ogenienis.testnet
Total Quotes
The total number of quotes within the contract is returned by this function.
near view dev-1674296775418-58495141920439 total_quotes --accountId=ogenienis.testnet

Tip Author
The sub-account we previously set up needs to be used to tip the author of a quote. Also, 1NEAR is attached to the function call, which is 10^24 Yocto. Yocto is the smallest denomination of the NEAR Token.
near call dev-1674296775418-58495141920439 tip_author '{"id": "QUO-1674297436602231522"}' --depositYocto=1000000000000000000000000 --accountId=quote.ogenienis.testnet

By using the fetch_quote function, you can see the total number of tips for the quote you just tipped.
Delete Quote
The quote is selected and removed from the state of the contract using the delete quote function, which accepts the argument id as a payload.
near call dev-1674296775418-58495141920439 delete_quote '{"id": "QUO-1674252113803434847"}' --accountId=ogenienis.testnet
The result of the removed quote is shown in the image below.

Call fetch quotes and check to see if the deleted quote is still present to be certain.
With that, we successfully deployed a functional smart contract to the NEAR Testnet blockchain. 🚀 🚀
In the next part of this tutorial, we will create a user interface and connect the frontend to interact with the deployed smart contract on the NEAR blockchain.
Build a Fullstack DAPP on NEAR using Rust, Near-API-Js, React & Chakra-UI: Frontend
Stay tuned!
Conclusion
In this article, we explored how to build a smart contract on the NEAR blockchain using Rust. We created the state of the contract and the functions to interact with the contract on the NEAR blockchain. Explore the contract's source code on my GitHub Repository.